Wednesday 30 May 2012

Ignition

Ignition Tested Engine
Spark Plugs


All four spark plugs were removed and examined for damage the main problem the plugs had was a build up of soot or carbon deposits on the plugs this can be caused by the mixture being to rich or the ignition being to weak. Causes miss firing, hard starting and hesitation.


Plugs Removed. shows build up of carbon at sparking ends of plugs

Can be stopped by adjusting the mixture by turning mixture screw on carburettor or finding source of ignition problem. Process explained below
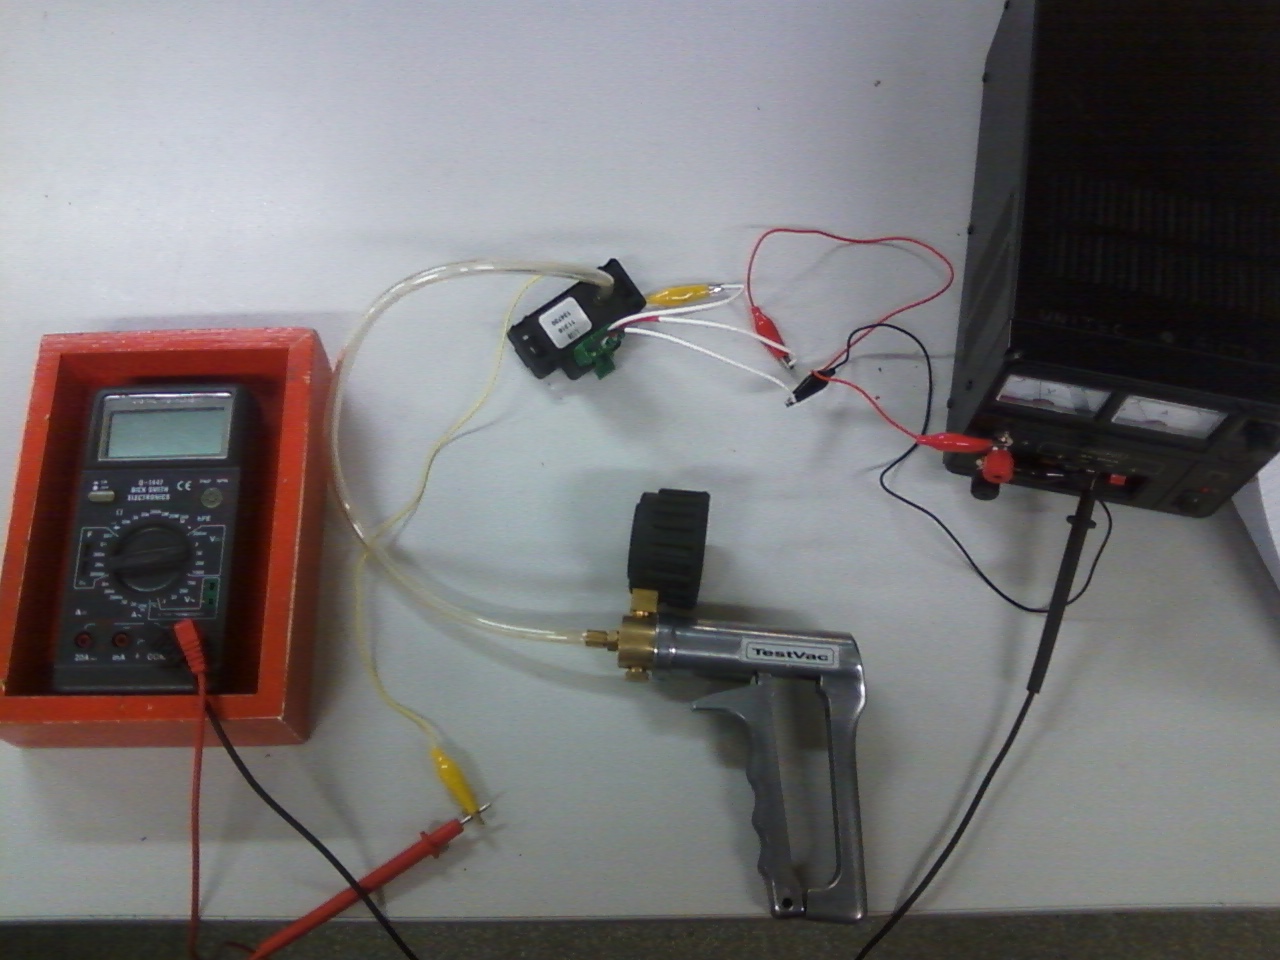

High Tension leads


These are tested by measuring length of leads and getting resistance with a Ohm meter connected to each end of leads. resistance should be 33.5Ω Per mm 
(eg. 600mmx33.5Ω=20100Ω) 
All the tested leads were within specification with the highest resistance of 3900Ω detected by meter which was below the maximum resistance allowed.
If the resistance was higher than maximum this would indicate that there is broken wires in the lead which would cause too much resistance in lead for distributor to work efficiently effecting spark strength.


Distributor Adjusting


The distributor was also adjusted to make sure it is delivering current to spark plugs at the correct time during the combustion cycle. If it was not doing this it would cause a loss of power or poor fuel economy if spark was not occurring at the correct time.  


Process of  Adjustment
  1. Remove distributor from crankcase 
  2. Turn engine over using spanner on front of pulley until exhaust valve was fully open 
  3. continue to slowly rotate until intake valve begins to move
  4. Now distributor will be aligned correctly and can be put back on engine
  5. move distributor at bolting point until reading on ohm meter shows "OL" meter is connected to a earth and positive lead goes to solenoid connector 
  6. tighten bolt enough so that rotor can be moved and shows a reading on the ohm meter of 0.03Ω this shows a circuit to spark plugs.    

Ignition Timing


 this is checked using a timing light and tachometer. Timing is important because it determines when spark should be occurring during combustion cycle. Spark plugs should be activating after piston reaches TDC at peak cylinder pressure. If it is not doing this engine power and fuel economy will be greatly effected because spark is not happening at correct time. The tested timing was out of spec and would need to be adjusted to allow for correct sparking


Process of Testing
  1. Connect timing light to battery and 1 of the spark plugs and connect multimeter set on RPM and tachometer attached to same lead 
  2. Gradually increase engine RPM until timing mark on pulley begins to move from starting position 
  3. continue to increase RPM until timing mark stops advancing and record RPM 
  4. obtain total advance by taking away total from recorded results (eg. 16 degrees - 5 degrees = 11 degrees ) 

Monday 28 May 2012

Diesel Timing and Bleeding

Diesel Bleeding

Engine that was bleed a Nissan TD27


This is done to remove air from the fuel lines in a diesel injection system. Because a diesel engine does not use spark plugs for combustion and instead uses compression to get a reaction air in the system will prevents the fuel from atomising correctly preventing the injectors from delivering enough fuel to the combustion chambers.
Bleeding was done by first clamping the fuel line of the diesel fuel filter and then removing it and emptying out the fuel from it into a container. 
Then replacing it and pumping the priming pump to remove excess air from the system. After this is complete the remaining air in the fuel lines can be removed by loosening each Injector one at a time to shut down one of the cylinders and allow the air to escape from the combustion chamber through the injectors to clear the lines.

Diesel pump and fuel filter

Electronic Shut off Valve

This is used to stop the engine from running when ignition key is turned off. Because a diesel engine does not use a ignition system that uses spark plugs turning off the key would not stop the engine from running under normal circumstances. So that is why a electronic shut off valve is used. It shuts off the engine using a solenoid controlled system that when the key is turned off the magnetic field of the solenoid collapses and plunger is forced to drop down and stop the flow of diesel from the pump. This in turn cause the engine to stop running.
Testing of this device is done using a ohmmeter to measure the resistance across the solenoid coil and a Voltmeter to check the supply voltage to solenoid.
The tested solenoid was in good order as the correct resistance of 7.5Ω  and a supply voltage of 12.95V was going to it. If the correct resistance was not shown this would mean that the solenoid was unable to work correctly and solenoid would not stop engine correctly and would need replacing.

Pump Timing

Diesel Pump

It is necessary to time the pump correctly because if it is not timed right it will be delivering the fuel at the wrong time during combustion, in turn causing the engine to run badly. 
this was tested using a DTI gauge.

Process:
  1. First the gears needed to be aligned correctly using the indicator marks on them  
  2. Picture showing pulleys and belt used to time engine
  3. Once aligned correctly belt was reset and tensioned.
  4. DTI (Dial Test Indicator) gauge was screwed into pump and zeroed at 1 degree.
  5. Engine was then rotated 30 degrees to BTDC and reading was taken from gauge. The needle of gauge is supposed to go in a complete rotation and stop a 1mm if pump is set correctly.
  6. Pump can be adjusted by turning it at bolts that till 1mm is read.  
DTI as it is set in pump
If pump is not aligned correctly it would be delivering fuel at the incorrect time during combustion causing it to run rough or not at all.

Wednesday 23 May 2012

Injector Testing and EFI Self Diagnosis Codes

Today I completed testing of Injectors and learned how to read codes sent from ECU to identify faults.

Injector Testing

The first Test I did was the Testing of Injectors this was done in 3 different ways; using a screwdriver to check if injectors were pulsing, Using a Logic probe to show pulses, (the one I made earlier) and using a multimeter set on duty cycle. 
The most accurate test of the 3 was using the multimeter set on duty cycle. As this showed a more accurate amount of time that the injectors were active. (duty cycle) According to the readings displayed on the ohmmeter, when the car was idling the injectors were active around 5% of the time and when car was revving higher this increased to around 50% of the time.
Using the other 2 methods were far less accurate because they only showed that the injectors are working as only a sound or flashing of LED. This did not show the exact way injectors were functioning. 

EFI Self Diagnosis Codes

The second test was done by reading diagnostic codes from the ECU when a fault was occurring.
This was done using the check engine light, on the cars dashboard and using it to signal a fault code. This was done by bridging 2 terminals on the diagnostic plug. The terminals were TE1 to E1. Then observing the code as the check engine light flashed it on the dashboard. It indicates this by flashes then pauses.


Example of Diagnostic code flashing. this one is showing code "31" 
(3 flashes short pause then single flash)
which indicates a MAP sensor problem

The circuit that needed repairing was the water temperature circuit (code "22") as indicated by the check engine light. To repair this the sensor will need to be checked using a heat source and a ohmmeter and taking readings of the resistance at cold and hot by heating the sensor. Resistance should decrease as water temperature increases. If it was not doing this the sensor will be malfunctioning and will need to be replaced with a good sensor.

If it is not replaced this would cause the sensor to send incorrect readings to the ECU and the injectors will not be delivering the correct air fuel ratio at the right time and would cause the engine to run rich, decreasing the engine efficiency.  


Monday 21 May 2012

EFI On Car Testing

Toyota 4A-FE that was used to conduct the first tests
Today I began The on car EFI testing the tests that I did were for Fuel Pressure and fuel  flow.

Checking Fuel Pump 
This Test involved inspecting various fuel pressures under different operating conditions these conditions are: fuel pressure at idle, the maximum pressure and the residual pressure.
Idle Pressure: Test involved watching the fuel pressure gauge when car was running at idle this showed a pressure of 265 kPa which was within manufactures specs of 265kPa - 304kPa.
Maximum fuel pressure: this test involved removing the vacuum hose from the fuel pressure regulator and then blocking it with your finger and reading what the fuel pressure is showing. There was a reading of 44PSI on the gauge and manufactures specs were 38-44PSI so it was within specs.
Residual Pressure: This test was done with the engine switched off and pressure read on gauge after 5 minutes to see how it was holding this showed a pressure of 250kPa and manufactures specs were 206-255kPa.

If when tested the fuel pressure was to high this would cause the injectors to put too much fuel into the combustion chambers and would cause the engine to run rich causing poor fuel economy, and fouled spark plugs.  
If the fuel pressure was too low this would cause a rough idle, poor engine performance and misfiring.This could be to do with the fuel filter being clogged and would need replacing.
If there was no fuel pressure at all this could mean pump is malfunctioning or needs replacing.    

Fuel Flow 

This test involves testing how well the fuel pump is delivering fuel to the injectors and was done by first removing the fuel pressure from fuel lines by removing the fuel pressure relay and then cranking engine until the pressure has dropped to zero. Then disconnecting the fuel line and running it into a measuring container. Then turning the ignition on and running the pump for 15 seconds and then recording the results.
The tested engine had a fuel flow of 3.6L per minute. which was within specification of 2.5 - 3.5L per minute.
The amount of fuel was slightly above required but was not a major problem as it is better to have more fuel flowing. If not enough fuel was being delivered (running Lean) this would cause the vehicle to be down on power and cause surging or slow response on acceleration. 

Sunday 20 May 2012

EFI Component Testing

This week completed the EFI off car component testing I tested the MAF sensor, Diesel Injector Spray, glow plug testing and Ignition coil testing.

MAP Sensor Testing

MAP sensor that was tested
The test Involved using a Multimeter, a power source, and a vacuum pump. 
The sensor was required to be connected to a 5V reference voltage which was obtained by setting the power source to 5V and connecting sensor to it via jumper wires, to the red and black wires and then connecting voltmeter + probe to the white wire and - probe to earth.
after this was done the vacuum pump was attached  to sensor pipe and then readings were taken at various pressures caused by pump ranging from 100mmHg  to 500mmHg.

Testing. connected to MAP Sensor, Voltmeter, Vacuum pump and 5V power source
The readings I got from the meter indicated that the sensor was working correctly because as vacuum pressure went up voltage dropped: 100mmHg with 4.26V and at maximum vacuum 500mmHg, 1.47V was shown. 
If the readings were reversed this would indicate that the sensor was causing incorrect voltage drops making the engine run rich at incorrect times. As vacuum preasure increases (under load) voltage drop decreases and when vacuum pressure decreases (at Idle) Voltage increases.


Diesel Injector Spray Testing


This was tested using the hartridge spray tester. Which is used to check spray patterns of diesel Injectors while the are off the car. This was done by screwing the injector into the tester, which uses a type of oil to show how the injector is spraying and how much pressure is needed to make it spray. As long as its within manufactures specifications.


Spray Tester with injector screwed into it (Left) pressure reading is on screen to right

The tested injectors spray patterns were not the best only 1 of the 4 tested was spraying correctly as it was much finer than the rest.
If injectors are malfunctioning this would cause the engine to be inefficient, as more fuel is needed, and engine power would also be lost because the injector cannot keep up with the demand for fuel as well.


Glow Plugs


I also tested 4 glow plugs to see if the correct resistance and current flow was being used by them. 3 of the 4 plugs were working correctly because they first showed a reading of around 10A and then dropped to around 6A because the current was being used to make the plug glow. 

Plugs that were tested.
They were attached to a 10V power source and readings were taken by a ohm meter and current flow was measure amps on the power source.plugs were left to run for a maximum of 10 seconds to prevent damage to them. 

The plug that was not working did not cause the current to drop and did not glow in the length of time that it was tested. So this plug would not heat up the combustion chamber in time and would cause the vehicle to have difficulty starting when cold, because it was not heating up the compressed air to allow ease of combustion while cold.

ECU Inputs and Outputs with Oscilloscope 

The O2 Sensor was also tested with the Oscilloscope to check the input and output signals to examine what it is doing while the engine is Idling.

Oscilloscope in action. O2 was tested using the signal board of the 4G-FE engine

The scope showed a wave like form which shows when the engine is on a lean or rich cycle depending on the voltage of the signal.


Example of O2 sensors wave form. The peaks are when engine
 is running rich and the troughs are when engine is running lean


Ignition Coil Testing 

The ignition coil was also tested this involved the use of a Vacuum pump like used in the MAP testing and a Multimeter. 


The vacuum was used to test 3 coil diaphragms for any leakage and correct movement of the linkage. The tested diaphragms were in good order as vacuum held and linkage moved correctly with a vacuum pressure of 400mmHg. If the pressure was being lost or linkage was not moving this would effect fuel economy as the vacuum will not have the correct pressure from the manifold and it would control the spark advancing incorrectly causing the engine to run rich when it shouldn't be.


The coil was also tested for the correct voltage supply to the spark plugs. This was tested using a voltmeter and checking the resistance at the primary terminal and the secondary winding terminal.
The coils I tested both had problems with the amount of resistance at different terminals one had the incorrect resistance at the primary winding with 1.5Ω when it should be 1.3Ω or less and the other at the secondary winding with 8.1KΩ when it should be 7KΩ or less.
These faults would cause a weak spark at the spark plugs or no spark at all. Effecting engine performance and could cause missing, the engine to cease running when coil heats up, or it not  to start at all, and would need replacing.


Sunday 13 May 2012

ECU Input and Output Testing

Engine that was used to test sensors. it is a Toyota 4A-FE out of a Carina


Today I completed the ECU Input and output testing. This Involved checking: 
  • Battery voltage 
  • Coolant temperature sensor 
  • Throttle position sensor 
  • MAP sensor
All of these tests were done with a multimeter on either voltage AC or DC or on the duty cycle setting. then putting the probes of multimeter into there respective signal ports. 

How Sensors were tested.
To left of picture is the signal board with each sensor that was available to check, on it at each green port.
 in this picture the coolant temperature sensor voltage was being read  1.5V at this time engine was running and not quite at operating temperature.
Results

Battery Voltage: When tested battery showed a voltage of 13.9V when not running and when engine was running 14.2V Which was within specifications because this meant that the alternator was working correctly as voltage across battery should increase to around 14V when running due to alternator regulating voltage correctly. If it was lower or higher there would be a problem with voltage regulator and would need replacing.

Coolant temperature sensor: This showed a voltage of 3.15V when engine was cold and once engine heated up to operating temperature this voltage dropped to 1.2V Indicating it was working correctly, because voltage should drop as engine temperature increases because the sensor contains a wax element which expands when hot this causes resistance to increase and voltage to drop. If voltage did not drop this would mean that the sensor is malfunctioning causing engine to run rich and would need replacing.

Throttle Position Sensor: Voltage of 0.60V was shown when throttle was closed then it increased to 3.85V when throttle was fully open because of resistance decrease. If the resistance had not decreased when the throttle was completely open the ECU would not tell injectors to deliver the correct amount of fuel causing the engine to run lean. drastically effecting engine performance and sensor would need replacing.

MAP Sensor: This showed a voltage of 0.82V when Idling and when engine was accelerating a reading of 0.91V and when throttle was fully open a voltage of 1.78V was shown.  These readings were all correct. If voltage was to low or too high in these different throttle levels this would cause the ECU to receive incorrect signals and the pulse of the injectors would be at wrong intervals effecting the air fuel mixture, effecting engine performance. 


Tuesday 8 May 2012

Today I began the Fuels and fuel systems unit 4843 this blog will contain my reflections on the subject studied.


O2 Sensor Tester

The first thing I did in this unit was make a Lambda Sensor Tester (or 02 sensor).


This is used to Identify the signal of the O2 sensor of a EFI engine, that it is sending to the ECU of the car. This allows the driver to see the air fuel mixture while driving. As the O2 sensor detects Ratio it lets of a Voltage that is different depending on whether the engine is running a rich, lean or Stoich mixture. 
  • If running rich Red LED will glow (above 0.63V) this LED should be only on when Car is accelerating or when engine is cold.
  • If Stoich (Ratio of 14.7:1) Yellow LED will glow (0.23V - 0.63V) this LED should only be on intermittently and not stay on all the time. 
  • If running lean Green LED will glow ( below 0.23V) this LED should only be on when decelerating while engine is warm. or when engine has just been turned on after a period of not running. (eg. when car has been sitting overnight.) 


 To make this required a PCB board to be assembled using: 
  • 7 Resistors of different values, 
  • 4 diodes, 
  • 3 LEDs, 
  • 2 capacitors, 
  • 1 Microchip and 3 wires. 
Pictures bellow:

LEDs Soldered into Board

All components Soldered into board on opposite side to LEDs

Box used to house board. 3 holes were drilled into cover of box to allow LEDs to
be visible and 1 hole in side of box to allow wires to exit box